Difference between revisions of "Blog 13"
| (13 intermediate revisions by the same user not shown) | |||
| Line 2: | Line 2: | ||
== Scroll Menu == |
== Scroll Menu == |
||
In this post I am making a Scroll Menu, what is a menu where I can choose from a list of my previous and future menus to use. |
|||
Scroll Menu with multiple functions, where with every functions you can set up certain things. |
|||
This is pretty handy so that I don't have to type in a command line to go to an other menu. Everything can just be controlled with the buttons on the |
|||
Example: |
|||
Rp_ui_board([[User Interface]]). |
|||
Changing Alarm Time |
|||
Changing volume |
|||
The mission is to make it possible that the menu goes up and down and that I then can select between the 2 options displayed on the first and second line of the Rp_ui_board([[User Interface]]). |
|||
The reason I made this, is because I don't want to use the raspberry pi only for just 1 thing. |
|||
What every button does: |
|||
I want to use it for multiple script and don't want to use a command section to get the an other script. |
|||
| ⚫ | |||
Here I can also put all my future projects in. |
|||
First mission is to make it possible that it goes up and down in the menu and than choose a certain function. |
|||
| ⚫ | |||
*2. Select option 2 |
*2. Select option 2 |
||
*3. |
*3. Go to the begin of the menu |
||
*4. Go to the End of the menu |
*4. Go to the End of the menu |
||
*5. |
*5. Scroll down in the menu |
||
*6. |
*6. Scroll up in the menu |
||
| ⚫ | |||
| ⚫ | |||
Don't forget to make an exit function in every script you make that you want to put in the array of menus! |
Don't forget to make an exit function in every script you make that you want to put in the array of menus! |
||
| Line 26: | Line 22: | ||
# Element 0 1 2 3 4 5 6 7 8 9 10 11 |
# Element 0 1 2 3 4 5 6 7 8 9 10 11 |
||
An array is a list names that are put together and you can find with |
An array is a list names that are put together and you can find with asking for it's number. |
||
The number counting begins with 0 and ends until you stopped giving names. |
The number counting of arrays begins with 0 and ends until you stopped giving names. |
||
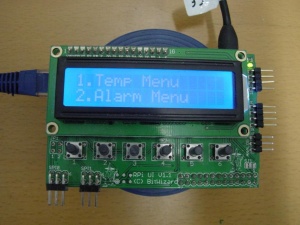
For this I used 2 |
For this I used 2 previous scripts(option 1([[blog 10]]) and 2([[blog 12]])) and give the other 10 random names. ( I only did that to show the scrolling works. ) |
||
[[File:ScrollMenuStart.jpg|300px|thumb|none|]] |
|||
Narray=( "Temp Menu" "Alarm Menu" Settings "Board menu" "Fries Menu" "Banana Menu" "vega burger" "wc menu" Bananaphone "2001:ABC" "ghost server" "My name is...") |
Narray=( "Temp Menu" "Alarm Menu" Settings "Board menu" "Fries Menu" "Banana Menu" "vega burger" "wc menu" Bananaphone "2001:ABC" "ghost server" "My name is...") |
||
| Line 34: | Line 32: | ||
This is the second script and I called it Narray. (Names Array. You can of course call it what ever you want ) |
This is the second script and I called it Narray. (Names Array. You can of course call it what ever you want ) |
||
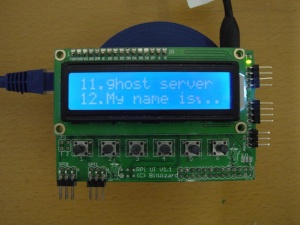
This array I made to print this text out. |
This array I made to print this text out on the display. I also could just have used the previous array, but with the second array I can print better names on the display. |
||
I only did that to |
As you can see some of these names don't use quotation marks, I only did that to show that you only really need to put quotation marks if you want to print a text with a space in it. |
||
The display is 16x2, so you can only use a maximum amount of 16 characters in every row. |
|||
And also here I gave the other 10 random names. |
|||
[[File:ScrollMenuEnd.jpg|300px|thumb|none|]] |
|||
if [ $BDetect = "20" ]; then |
if [ $BDetect = "20" ]; then |
||
./${array[$Number]} |
./${array[$Number]} |
||
fi |
fi |
||
if [ $BDetect = "10" ]; then |
if [ $BDetect = "10" ]; then |
||
./${array[$Numb2]} |
./${array[$Numb2]} |
||
fi |
fi |
||
This |
This part checks if button 1(20) or 2(10) is pressed. If one of the buttons is pressed it looks in the array with the given number and will than run that script. |
||
So if button 1 is pressed and Number = 2 it will run Jaap. |
|||
And if button 2 is pressed and Numb2 = 3 it will run Tim. |
|||
if [ $BDetect = "02" ]; then |
if [ $BDetect = "02" ]; then |
||
Number=$(((Number + 10) % 12 )) # |
Number=$(((Number + 10) % 12 )) #can be changed to 11 if you want it to get 1 down |
||
fi |
fi |
||
| Line 56: | Line 58: | ||
fi |
fi |
||
In this part it counts up or down with which the button is pressed. With button |
In this part it counts up or down with which the button is pressed. With button 5 is counts down an with button 6 it counts up. |
||
The program counts down and up with 2, thanks to that every time 2 new options gets showed on the display. In the array there are 12 menus, so I used %12 so that when counting up or down it will continue at the top or the beginning. ( So that you don't have to go all back to option 2-4 when you are at option 11-12. ) |
|||
I also explained |
I also explained working with % in [[blog 12]]: |
||
With % it |
With % it divides the number before it with the number after it and will give as result the number that couldn't get shared through it. |
||
So simple examples: |
So simple examples: |
||
12%5 (12:5)=2 | 2 times 5 | 2*5=10 | 12-10 = 2 |
12%5 (12:5)=2 | 2 times 5 | 2*5=10 | 12-10 = 2 |
||
14%12 (14:12)=1 | 1 time 12 | 1*12=12 | 14-12 = 2 |
14%12 (14:12)=1 | 1 time 12 | 1*12=12 | 14-12 = 2 |
||
| ⚫ | |||
| ⚫ | |||
Numb2=$((Number + 1)) |
Numb2=$((Number + 1)) |
||
Numb3=$((Numb2 + 1)) |
Numb3=$((Numb2 + 1)) |
||
Numb2 and Numb3 will read the numbers that later should be displayed. The given numbers will get a +1, because otherwise the menu will start with 0 instead of 1. |
|||
This is of course the same with the second line. That also has to be 1 more. |
This is of course the same with the second line. That also has to be 1 more. |
||
The given numbers will be printed at the beginning |
The given numbers will be printed at the beginning thanks to "$Numb2"at the first row and "$Numb2" at the second row. |
||
After that it will print the names on the name Array. |
After that it will print the names on the name Array.( Narray ) Thanks to Narray reading the numbers [$Number] and [$Numb2]. |
||
bw_tool -I -D /dev/i2c-1 -a 94 -W 11:00 |
bw_tool -I -D /dev/i2c-1 -a 94 -W 11:00 |
||
| Line 79: | Line 81: | ||
bw_tool -I -D /dev/i2c-1 -a 94 -t "$Numb3""."${Narray[$Numb2]} |
bw_tool -I -D /dev/i2c-1 -a 94 -t "$Numb3""."${Narray[$Numb2]} |
||
The |
The script all together is: |
||
#!/bin/bash |
#!/bin/bash |
||
| Line 132: | Line 134: | ||
done |
done |
||
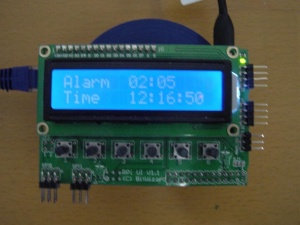
[[File:AlarmMenuStart.jpg|300px|thumb|none|This is the Alarm Menu that you can see if you activate it with button 2]] |
|||
Latest revision as of 11:21, 19 November 2015
Scroll Menu
In this post I am making a Scroll Menu, what is a menu where I can choose from a list of my previous and future menus to use. This is pretty handy so that I don't have to type in a command line to go to an other menu. Everything can just be controlled with the buttons on the Rp_ui_board(User Interface).
The mission is to make it possible that the menu goes up and down and that I then can select between the 2 options displayed on the first and second line of the Rp_ui_board(User Interface). What every button does:
- 1. Select option 1
- 2. Select option 2
- 3. Go to the begin of the menu
- 4. Go to the End of the menu
- 5. Scroll down in the menu
- 6. Scroll up in the menu
For this script I used some techniques from the previous script blog 12(AlarmMenu).
Don't forget to make an exit function in every script you make that you want to put in the array of menus!
array=( pushmenu2 AlarmMenu Jaap Tim Martin Koos Willem Bas Luuk Richard Nick Alex)
# Element 0       1         2    3   4      5    6      7   8    9       10   11
An array is a list names that are put together and you can find with asking for it's number. The number counting of arrays begins with 0 and ends until you stopped giving names. For this I used 2 previous scripts(option 1(blog 10) and 2(blog 12)) and give the other 10 random names. ( I only did that to show the scrolling works. )
Narray=( "Temp Menu" "Alarm Menu" Settings "Board menu" "Fries Menu" "Banana Menu" "vega burger" "wc menu" Bananaphone "2001:ABC" "ghost server" "My  name is...")
# Element 0           1           2         3            4            5             6             7        8            9          10             11
This is the second script and I called it Narray. (Names Array. You can of course call it what ever you want ) This array I made to print this text out on the display. I also could just have used the previous array, but with the second array I can print better names on the display. As you can see some of these names don't use quotation marks, I only did that to show that you only really need to put quotation marks if you want to print a text with a space in it. The display is 16x2, so you can only use a maximum amount of 16 characters in every row.
if [ $BDetect  = "20" ]; then
   ./${array[$Number]}
fi

if [ $BDetect  = "10" ]; then
  ./${array[$Numb2]}
fi
This part checks if button 1(20) or 2(10) is pressed. If one of the buttons is pressed it looks in the array with the given number and will than run that script. So if button 1 is pressed and Number = 2 it will run Jaap. And if button 2 is pressed and Numb2 = 3 it will run Tim.
if [ $BDetect  = "02" ]; then
  Number=$(((Number + 10) % 12 )) #can be changed to 11 if you want it to get 1 down
fi

if [ $BDetect  = "01" ]; then
  Number=$(((Number + 2) % 12 )) #can be changed to 1 if you want to get it up by 1 / I did 2 because I think that is more functional.
fi
In this part it counts up or down with which the button is pressed. With button 5 is counts down an with button 6 it counts up. The program counts down and up with 2, thanks to that every time 2 new options gets showed on the display. In the array there are 12 menus, so I used %12 so that when counting up or down it will continue at the top or the beginning. ( So that you don't have to go all back to option 2-4 when you are at option 11-12. ) I also explained working with % in blog 12: With % it divides the number before it with the number after it and will give as result the number that couldn't get shared through it. So simple examples:
12%5 (12:5)=2   | 2 times 5  | 2*5=10  | 12-10 = 2
14%12 (14:12)=1 | 1 time  12 | 1*12=12 | 14-12 = 2
The numbers that are given as result for pressing the button, will then be send to the last part of the script.
Numb2=$((Number + 1))
Numb3=$((Numb2 + 1))
Numb2 and Numb3 will read the numbers that later should be displayed. The given numbers will get a +1, because otherwise the menu will start with 0 instead of 1. This is of course the same with the second line. That also has to be 1 more.
The given numbers will be printed at the beginning thanks to "$Numb2"at the first row and "$Numb2" at the second row. After that it will print the names on the name Array.( Narray ) Thanks to Narray reading the numbers [$Number] and [$Numb2].
bw_tool -I -D /dev/i2c-1 -a 94 -W 11:00
bw_tool -I -D /dev/i2c-1 -a 94 -t "$Numb2""."${Narray[$Number]}
bw_tool -I -D /dev/i2c-1 -a 94 -W 11:20
bw_tool -I -D /dev/i2c-1 -a 94 -t "$Numb3""."${Narray[$Numb2]}
The script all together is:
#!/bin/bash
bw_tool -I -D /dev/i2c-1 -a 94 -W 10:00

while true; do
BDetect=`bw_tool -I -D /dev/i2c-1 -a 94 -R 30:b`

array=( pushmenu2 AlarmMenu Jaap Tim Martin Koos Willem Bas Luuk Richard Nick Alex)
# Element 0       1         2    3   4      5    6      7   8    9       10   11

Narray=( "Temp Menu" "Alarm Menu" Settings "Board menu" "Fries Menu" "Banana Menu" "vega burger" "wc menu" Bananaphone "2001:ABC" "ghost server" "My  name is...")
# Element 0           1           2         3            4            5             6             7        8            9          10             11

 if [ $BDetect  != "00" ]; then
    bw_tool -I -D /dev/i2c-1 -a 94 -W 10:00
 fi

 if [ $BDetect  = "20" ]; then
    ./${array[$Number]}
 fi

 if [ $BDetect  = "10" ]; then
   ./${array[$Numb2]}
 fi

 if [ $BDetect  = "08" ]; then
    Number=0
 fi

 if [ $BDetect  = "04" ]; then
    Number=10
 fi

 if [ $BDetect  = "02" ]; then
    Number=$(((Number + 10) % 12 )) # can be changed to 11 if you want it to get 1 down
 fi

 if [ $BDetect  = "01" ]; then
    Number=$(((Number + 2) % 12 )) #can be changed to 1 if you want to get it up by 1 / I did 2 because I think that is more functional.
 fi

Numb2=$((Number + 1))
Numb3=$((Numb2 + 1))

bw_tool -I -D /dev/i2c-1 -a 94 -W 11:00
bw_tool -I -D /dev/i2c-1 -a 94 -t "$Numb2""."${Narray[$Number]}
bw_tool -I -D /dev/i2c-1 -a 94 -W 11:20
bw_tool -I -D /dev/i2c-1 -a 94 -t "$Numb3""."${Narray[$Numb2]}

sleep 1

done


