Blog 10
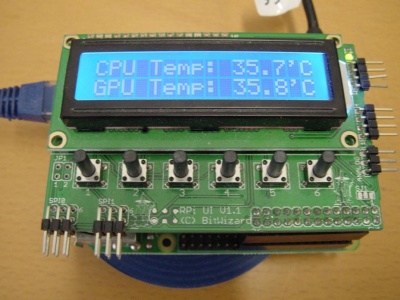
Hello, In this post I am going to show the push menu I made. In the push menu I have the 6 previous scripts I previous made and putted them together. With every button on the push button one of the scripts can run.
The list of buttons with which script they run:
- 1. Temperature (From blog 05)
- 2. Time with load averages (From blog 04)
- 3. CPU + GPU (From blog 08)
- 4. Temperature at weather station (From blog 09)
- 5. Wind a weather station (From blog 09)
- 6. Defining Temperature ( Not visible on the display! ) (From blog 05)
I still had to modify most of the scripts. I didn't want to change them so I made a copy that I could edit. Example:
cp timer time_load
With modifying the scripts I made them more basic, so that they only print their information on the display. ( If I wouldn't do this it will make the screen refresh too much or ignore me pushing the button ) So the things I had to remove from the scripts were:
- while true; do
- done
- echo
- 10:00
- 11:00
- sleep
Note! You shouldn't delete 11:20, because the script from the push menu isn't made to also remove the second line. It only cleans first line with 11:00.
Example from how the 'Time with load averages'(./time_load) has to look like after removing everything that is not needed:
#!/bin/bash

DISPL="bw_tool -I -D /dev/i2c-1 -a 94"

       load=`cut -d' ' -f-3 /proc/loadavg`
       $DISPL -t `date +%H:%M:%S`
       $DISPL -W 11:20:b
       $DISPL -t $load
This is than the script of the push menu:
#!/bin/bash

#Print=showtemp2
#Print=time_load
#Print=DIAMoscow2
#Print=cgpu2
#Print=DIAMWind
Print=ui
bw_tool -I -D /dev/i2c-1 -a 94 -w 10:00

while true; do
  Button=`bw_tool -I -D /dev/i2c-1 -a 94 -R 30:b`

  if [ $Button  != "00" ]; then
    bw_tool -I -D /dev/i2c-1 -a 94 -w 10:00
  fi

  if [ $Button  = "20" ]; then
    Print=showtemp2
  fi

  if [ $Button  = "10" ]; then
    Print=time_load
  fi

  if [ $Button  = "08" ]; then
    Print=cgpu2
  fi

  if [ $Button  = "04" ]; then
    Print=DIAMoscow
  fi

  if [ $Button  = "02" ]; then
    Print=DIAMWind
  fi

  if [ $Button  = "01" ]; then
    Print=ui
  fi

  bw_tool -I -D /dev/i2c-1 -a 94 -w 11:00
  ./$Print

  sleep 1
done
Print=ui
bw_tool -I -D /dev/i2c-1 -a 94 -w 10:00
The first row with #'s for them can be deleted. I made it so that I can choose which script the push menu has to start with. If you remove Print=ui, the display will start with an empty screen. (What isn't a problem, but you will get error messages on the terminal.) The 10:00 will at the start-up it remove everything from display.
while true; do
  Button=`bw_tool -I -D /dev/i2c-1 -a 94 -R 30:b`

  if [ $Button  != "00" ]; then
    bw_tool -I -D /dev/i2c-1 -a 94 -w 10:00
  fi
First it will look if there is a button pressed. If there is no button pressed it will be 00, and then it will be just refresh the previous chosen script. When a button is pressed 10 will directly remove the previous text. Because at the beginning of the code it will check: If 30:b doesn't check a number that isn't(with !=) 00 it will refresh the display. So everything will be removed when the button is pressed.
  if [ $Button  = "08" ]; then
    Print=cgpu2
  fi
Then it checks with 6 times if there is a button pressed with the number given in the if statements. When then for example someone presses button 1 -> 08. Then it is going to run the script: cgpu2.
( To detect which button gives which number. You have to copy paste this line and press the button you want to know:
bw_tool -I -D /dev/i2c-1 -a 94 -R 30:b
01
)
bw_tool -I -D /dev/i2c-1 -a 94 -w 11:00
./$Print
It says it has to place on the line 11:00. ( If you remove that part, it paste the text with the previous one, while refreshing.) With ./$print he then prints the information from the button that was last pressed. (So it would then print out the information from cgpu2 in our example. )
sleep 1
Thanks to the sleep you now have to wait a second for the refresh of the screen but also for the code to scan which button has been pressed.
I hope this can also be useful for your own use!
