Difference between revisions of "Raspduino"
(Created page with "thumb|300px|alt=The Raspduino V1.1|The Raspduino V1.1 This is the documentation page for the BitWizard Raspduino board. The Raspduino is an Arduin...") |
|||
| Line 14: | Line 14: | ||
=== ICSP/SPI jumper === |
=== ICSP/SPI jumper === |
||
It is possible to use this connector as an ICSP connector for the AVR, or an SPI connector. By default, this connector is configured as an ICSP connector, but by cutting the trace between the ICSP pad and the center pad, and shorting the center pad to the SPI pad, this connector can be used as an SPI connector. |
It is possible to use this connector as an ICSP connector for the AVR, or an SPI connector. By default, this connector is configured as an ICSP connector, but by cutting the trace between the ICSP pad and the center pad, and shorting the center pad to the SPI pad, this connector can be used as an SPI connector. For example to connect to one of the the BitWizard SPI expansion boards from the arduino. |
||
=== I2C jumpers === |
=== I2C jumpers === |
||
Revision as of 14:55, 5 December 2012
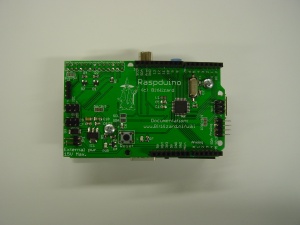
This is the documentation page for the BitWizard Raspduino board. The Raspduino is an Arduino compatible microcontroller board, designed to plug on top of a Raspberry Pi. It is then possible to add Arduino shields to the Raspduino.
The Raspduino is equipped with an ATmega328 controller.
Pinout
Jumpers
The raspduino has a number of jumpers, to configure it for multiple different scenarios.
ICSP/SPI jumper
It is possible to use this connector as an ICSP connector for the AVR, or an SPI connector. By default, this connector is configured as an ICSP connector, but by cutting the trace between the ICSP pad and the center pad, and shorting the center pad to the SPI pad, this connector can be used as an SPI connector. For example to connect to one of the the BitWizard SPI expansion boards from the arduino.
I2C jumpers
It is possible to connect the Raspberry Pis I2C bus to the I2C bus of the AVR. To do this, you need to short the SCL and SDA jumpers with a solder bridge.
Voltage selection jumper
It is possible to run the AVR on 3V3 or 5V when the Raspduino is connected to a Raspberry Pi. 5V Is thee default setting, but by cutting the trace between the 5V pad and the center pad, and connecting the 3V3 pad to the center pad with a solder bridge, you can set it to work on 3V3.
Powering the Raspduino
You can power the Raspduino in two different ways; By the Raspberry Pi it is plugged in, or if it is used stand-alone, you can connect an external power supply to the "External Power" conncetor. The supply voltage should be between 3V3 and 15V. If the voltage is higher than 5V, it will be regulated down to 5V.
Uploading a sketch
Future hardware enhancements
Suggestions are welcome.
Changelog
1.1
- Initial public release
