Difference between revisions of "Blog 24"
| Line 63: | Line 63: | ||
Paper tree: |
Paper tree: |
||
The paper tree is made by folding a green paper. On the folded green paper I put my RGB led connection. Around the RGB led I drew a Christmas tree. At the points where every single RGB led were laying I put a dot by using a pencil. |
The paper tree is made by folding a green paper. On the folded green paper I put my RGB led connection. Around the RGB led I drew a Christmas tree. At the points where every single RGB led were laying I put a dot by using a pencil. |
||
After that I cut the tree out and made holes at the pencil dots. After that I used some scotch tape to bring the front and back paper together. The final result: |
After that I cut the tree out and made holes at the pencil dots. After that I used some scotch tape to bring the front and back paper together. Similar scheme with instructions were at http://essaydune.com. The final result: |
||
[[File:RGBTree2.jpg|none|400px]] |
[[File:RGBTree2.jpg|none|400px]] |
||
You can of course go all crazy with the tree by adding glitters and stuff like that. |
You can of course go all crazy with the tree by adding glitters and stuff like that. |
||
=== The code === |
=== The code === |
||
Revision as of 12:03, 29 April 2016
Connecting the WS2812
First you just have to connect the WS2812 with a micro-USB cable to your device.
You have to use C-kermit or PuTTY:
For Linux/Raspberry:
apt-get install ckermit
If you use an other device, or want to know more:
C-Kermit
For Windows users it's optional to use:
PuTTY
On a UNIX device, when you want to run the code from the device to the WS2812. You have to type in the terminal:
/usr/bin/kermit -l /dev/ttyACM0
It could be that you have to send to/from an other destination.
It will then say C-kermit is opened. You then just have to type the letter:
c
It will tell you to turn off carrier watch with:
SET CARRIER-WATCH OFF
If you don't want to ask this every time you start up with c. You can make a new terminal and write:
nano .kermrc
That file(.kermrc) should only have the code:
SET CARRIER-WATCH OFF
When the carrier-watch is off you have to type c again.
Before you send a code to the ws2812 check it with:
gcc -Wall -o randomname randomname.c
After that you can send it to the ws2812 with:
./randomname > /dev/ttyACM1
Resetting the WS2812
Maybe you will get the experience that the ws2812 crashes and has to be reseted. When the RGB leds are still attached they will give a rainbow effect. To reset the WS2812 you have to put a cable in pin 5 of the 6 pin connector with a ground. The ground of the ws2812 is every odd number on the 16 pin connector. After that you can do the previous commands and everything should work fine again.
RGB lighted paper Tree
Hardware used:
Software used on my linux pc:
- C-kermit
Making the construction
The RGB leds:
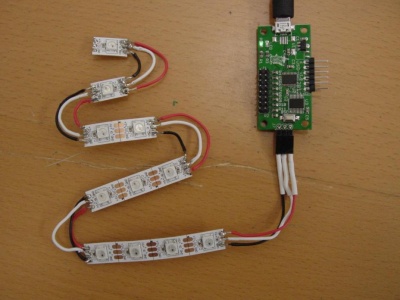
The image pretty much explains itself. What you have to do is connect RGB with the 3-pin header.( GND - pin 1 | DO - pin 2 | +5V - pin 3 ) The pointers of this example RGB strip should be pointing away from the WS2812 usb controller.
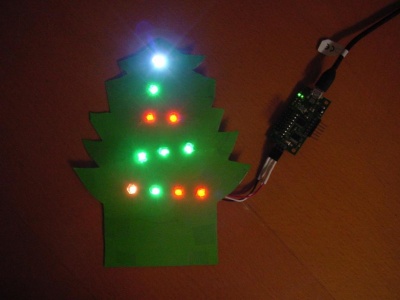
Paper tree: The paper tree is made by folding a green paper. On the folded green paper I put my RGB led connection. Around the RGB led I drew a Christmas tree. At the points where every single RGB led were laying I put a dot by using a pencil. After that I cut the tree out and made holes at the pencil dots. After that I used some scotch tape to bring the front and back paper together. Similar scheme with instructions were at http://essaydune.com. The final result:
You can of course go all crazy with the tree by adding glitters and stuff like that.
The code
The full c-program RGBTree.c can be downloaded: here.
What the code does in short is this: When starting up it will make the the peak RGB led white. It will then read the for statement where it goes through all the RGB leds(Except the peak). Every RGB led will randomly get the color green or red. The script will then keep fading the colors of the RGB leds to the opposite color. ( red to green or green to red )
The parts of the script that I will give some explanation:
This is the list of colors, with their given RGB values. This gets invoked later in the script to give the right color value.
#define WHITE  0x808080
#define YELLOW 0x808000
#define RED    0x800000
#define GREEN  0x008000
#define BLUE   0x000080
#define BLACK  0x000000
( The first two numbers behind 0x are for Red. The second two numbers are for green and the last two are for blue. )
Here the amount of time in milliseconds and steps given for to make the fading go fluent. ( later used in the script )
int nfadesteps = 30;
int delayms = 30;
In interpolate it will get the values from fadeto three times ( for every color r, g & b ). It will give new values to c1 and c2 it will bit shift it to the right, and give it the value together with 0xff. After that it calculates difference between previous color. The value would be send back which then could be printed out in the terminal in that display.
The bit shifting to the right is needed to
int interpolate (int c1, int c2, int shift, int pos, int end)
{
  c1 >>= shift;
  c2 >>= shift;
  c1 &= 0xff;
  c2 &= 0xff;

  return c1 * (end-pos) / end + c2 * pos / end;
}
Void fadeto receives the information from int main for example: (5, RED, GREEN). It will give the information to every single part of the RGB led. So in this example it would be that red will change from 80 to 00. The reason for making it 80, instead of FF is to makes the light not hurting your eyes. it will keep doing calculations of the steps until it reached 30(nfadesteps). After that it prints out on the certain RGB led that given color values. It also print that information in the C-Kermit terminal.
void fadeto (int pixnum, int col1, int col2)
{
   int i;
   int r, g, b;

   for (i=0;i <= nfadesteps;i++) {
      r = interpolate (col1, col2, 16, i, nfadesteps);
      g = interpolate (col1, col2,  8, i, nfadesteps);
      b = interpolate (col1, col2,  0, i, nfadesteps);
      printf ("pix %d %06x\n", pixnum,
	 (r << 16) | (g << 8) | (b << 0));

      usleep (delayms*1000);
   }
}
Here are the given amount of RGB leds is given. When you want to run the script you can give a value after it. ( ./randomname 20 ) When the script runs it will look if a value about one is given if it is true it will give nleds an new value.
After that the peak RGB led will become white.
int main (int argc, char **argv)
{
  int nleds = 10;
  int *pixels;
  int pixnum, newcolor;
  int i;

  if (argc > 1)
    nleds = atoi (argv[1]);

  pixels = calloc (nleds, sizeof(int));

  printf ("pix %d %06x\n", nleds, WHITE);
The for statement will count from zero till nine. Every time it counts one up it will get a random number and use a remainder that divides it to two. The result could be a zero or an one. If it is zero the color red will be given else it would be green. After that it will directly be printed, so that the for statement can count to the next number until it reached the end.
  for (i=0;i < nleds;i++){
    if (random () % 2 == 0)
       pixels[i] = RED;
    else
       pixels[i] = GREEN;
    printf ("pix %d %06x\n", i, pixels[i]);
  }
In the while statement it has to choose a random led. It does this by giving a random number and remainder it with nleds. It will then look if the chosen RGB led is red. If that is true it will say that the newcolor it has to become is green. Else the opposite will happen. ( The RGB led will become red. ) The given values will then be send to fadeto. ( Example: (5, RED, GREEN). After that it will replace the previous color with the newcolor. so pixels[05] would become green.
  while (1) {
     pixnum = random () % nleds;
     if (pixels[pixnum] == RED)
	newcolor = GREEN;
     else
       newcolor = RED;
     fadeto (pixnum, pixels[pixnum], newcolor);
     pixels[pixnum] = newcolor;
  }
  exit (0);

}


