Difference between revisions of "Blog 05"
(→!BETA!) |
|||
| Line 29: | Line 29: | ||
./ui |
./ui |
||
( There will be nothing |
( There will be nothing printed out when you activate it ) |
||
Revision as of 15:20, 16 September 2015
!BETA!
Now the temperature sensor: For making the temperature sensor we have to make 2 script.
Script 1(The name I gave it was: ui):
#!/bin/sh
ui="bw_tool -a 94 -I -D /dev/i2c-1"
$ui -W 70:c7 # internal tempsens with internal 1.1V as reference
$ui -W 71:c6 # external tempsens with internal 1.1V as reference
$ui -W 81:1000
$ui -W 82:6
$ui -W 80:2
After this we make ui executable:
chmod +x ui
And look if it worked:
ls -l ui
This result should have -rwxr-xr-x like me: -rwxr-xr-x 1 root root 216 Sep 7 15:46 ui
Ater you see it works activate it:
./ui
( There will be nothing printed out when you activate it )
chmod +x showtemp
ls -l showtemp
-rwxr-xr-x 1 pi pi 999 Sep 7 14:26 showtemp
apt-get install bc
sh -x ./ui
+ ui=bw_tool -a 94 -I -D /dev/i2c-1
+ bw_tool -a 94 -I -D /dev/i2c-1 -W 70:c7:b
+ bw_tool -a 94 -I -D /dev/i2c-1 -W 71:c6:b
+ bw_tool -a 94 -I -D /dev/i2c-1 -W 81:1000:s
+ bw_tool -a 94 -I -D /dev/i2c-1 -W 82:6:b
+ bw_tool -a 94 -I -D /dev/i2c-1 -W 80:2:b
sh -x ./showtemp
+ adcmaxval=65520
+ vperdeg=0.010
+ refvoltage=1.1000
+ offset=50
+ register_to_read=69
+ + bc
echo scale = 10
+ echo obase=16
+ echo 1.1000 / 0.010 / 65520
+ convfactor=.006E06E01
+ echo obase=16
+ echo+  scale=3
bc+ echo 50
+ offsethex=32
+ sudo bw_tool+  -I -Dtr a-z A-Z
 /dev/i2c-1 -a 94 -R 69:s
+ rawtemp=ACC3
+ echo ibase=16
+ echo scale=3
+ echo ACC3 * .006E06E01 - 32
+ bc
24.251648852
bw_tool -I -D /dev/i2c-1 -a 94 -R 81:s
0040
To edit the info
nano ui
Which has to change in to:
#!/bin/sh
 ui="bw_tool -a 94 -I -D /dev/i2c-1"
 $ui -W 70:c7:b # internal tempsens with internal 1.1V as reference
 $ui -W 71:c6:b # external tempsens with internal 1.1V as reference
 $ui -W 81:1000:s
 $ui -W 82:6:b
 $ui -W 80:2:b
bw_tool -I -D /dev/i2c-1 -a 94 -R 81:s
1000
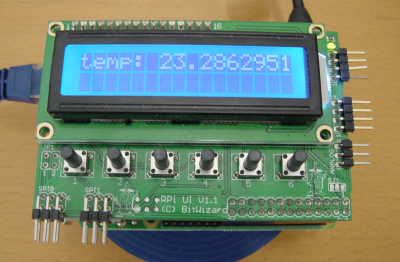
bw_tool -I -D /dev/i2c-1 -a 94 -t "temp: "`./showtemp`
The remove the latest one and see the newest you are doing it again
bw_tool -I -D /dev/i2c-1 -a 94 -w 10:00
bw_tool -I -D /dev/i2c-1 -a 94 -t "temp: "`./showtemp
Code that I used: http://www.bitwizard.nl/wiki/index.php/Temperature_sensor_example
( ui voor showtemp om werkende te krijgen time to wait )
bw_tool -I -D /dev/i2c-1 -a 94 -t "temp: "`./showtemp`
Now we have this. It may be better that we also get it to refresh around a several second instead we have to type the code:
bw_tool -I -D /dev/i2c-1 -a 94 -w 10:00
bw_tool -I -D /dev/i2c-1 -a 94 -t "temp: "`./showtemp
over and over again. So I am going to try to mix the previous code with temperature code so it will check the code every amount of time. ( I will take 5 sec )
nano friet
add this text:
( folder with a random name I called it friet. )
#!/bin/bash
 while true;do
        bw_tool -I -D /dev/i2c-1 -a 94 -w 10:00
        bw_tool -I -D /dev/i2c-1 -a 94 -t "temp: "`./showtemp`
        sleep 5
done
do like the other times:
chmod +x friet
On Blog 06 I combined made it possible to show the time and temperature on the display.
