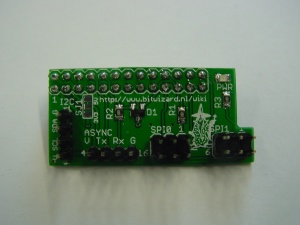
Raspberry Pi Serial
This is the documentation page for the Raspberry Pi Serial board.
The RPI_SERIAL board breaks out the serial busses on the raspberry pi. This allows the raspberry pi to communicate at 3.3V CMOS levels with say an arduino mini or other 3.3V asynchronous devices. But also the I2C bus and SPI busses are broken out. BitWizard has a bunch of expansion boards that can connect to those busses.
You can find the Raspberry Pi Serial board in the BitWizard shop.
This page will say more about the hardware in the future, once things are tested. For now see Raspberry pi expansion system page
Contents
Overview
The RPI_SERIAL board breaks out two SPI busses, the UART and the I2C bus of the BCM2835 SOC on the raspberry pi.
Possible Configurations
The board can be configured for EITHER 3.3V or 5V. This is done by moving a solder-jumper. See solder jumpers for how to move a solder jumper.
In contrast to the expansion boards that have a "default" setting for the solder jumper by having a small trace between two of the pads, the RPI_SERIAL boards have been designed to FORCE us to think about what option we want by not providing any default. So far most rpi_serial boards have been soldered for 5V prior to being shipped. Unless someone convinces us otherwise, this will probably remain like this.
If you remove the solder jumper and forget to put it back on in the other position (or if you fail to make the contact), the power led will not light.
Signal levels
Many expansion boards that you might want to connect to your raspberry pi will be 5V, whereas the Raspberry Pi works at 3.3V. To convert the signal levels you need a level shifter.
For I2C the board implements a level shifter as recommended by Philips (inventor of I2C).
For SPI and UART the 3.3V signals coming out of the Raspberry Pi are sufficiently high that all 5V devices that we could find recognized the signal as high. For the 5V signals going to the Raspberry Pi, we have limited the voltage to just above 3.3V by putting a scottky diode from the signal to the 3.3V, as well as a 1k resistor to limit the current. This sufficiently protects the raspberry pi from damage by the 5V signals from 5V devices.
Some care should be taken: The 5V device should NOT drive the signals that are normally driven by the raspberry pi. Normally you'd have two outputs driving against eachother, now there is also the 5V vs 3.3V issue....
Pinout
The 26 pin gpio connector is described at elinux: [[1]]
The SPI connector has the same pinout as the atmel 6-pin ICSP connector and is documented here: SPI_connector_pinout.
The I2C connector is documented here: I2C_connector_pinout.
The UART connector is documented here: uart connector pinout.
LEDs
There is one power led. (the current version of the board has "R5" silkscreened next to the footprint where we thing the led should be. We'll swap the led and resistor in the future.)
Jumper settings
none (or see above for "configuration options").
Programming
New: get bw_rpi_tools .
git clone https://github.com/rewolff/bw_rpi_tools.git
Now, you can use the tools in either the SPI or I2C subdirectory to communicate with bitwizard SPI or I2C boards that you might have.
Getting SPI and I2C drivers to work on raspian
sudo wget https://raw.github.com/Hexxeh/rpi-update/master/rpi-update -O /usr/bin/rpi-update
sudo chmod +x /usr/bin/rpi-update
sudo rpi-update
will install the latest kernels with spidev support. Next comment out the two blacklist lines in /etc/modprobe.d/raspi-blacklist.conf:
sudo mv /etc/modprobe.d/raspi-blacklist.conf /etc/modprobe.d/raspi-blacklist.conf.orig
sudo sed -e 's/^b/#b/' /etc/modprobe.d/raspi-blacklist.conf.orig > /etc/modprobe.d/raspi-blacklist.conf
(you could do this with your favorite editor, but this way you can just cut-paste these lines and get it done....)
Changelog
- Initial public release

